Marketo is a marketing automation software that helps streamline, manage, and optimize your marketing activities more efficiently.
In this article, we will discuss:
- The benefits of integrating with Marketo
- How to set up the integration
- How to automatically send contacts to Marketo
The Benefits of Integrating with Marketo
Before setting up the integration, let's first look at its benefits. With the integration, you can:
🚀 Link Contacts to Marketing Campaigns
Leadinfo recognizes website visitors and provides detailed information about their companies, such as name, location, industry, and even employees. By linking this data with Marketo, relevant contacts are directly included in your marketing automation, enabling quick follow-up.
💰 Create More Effective Marketing Campaigns
With insights from Leadinfo, such as pages visited and time spent on the site, you can set up targeted campaigns using Marketo. This increases the relevance of your marketing messages and the likelihood of converting leads.
✅ Better Reporting and Analytics
The integration between Leadinfo and Marketo provides valuable insights into the performance of your marketing campaigns. By combining Leadinfo data with Marketo’s analytics tools, you can more accurately measure the ROI of your campaigns and identify which companies are most interested in your products or services.
🔗 CRM System Synchronization
Marketo’s integration with various CRM systems allows your sales and marketing teams to access Marketo data directly, enhancing collaboration between departments and ensuring that everyone has the right information.
How do I connect Marketo to Leadinfo?
Step 1: Go to your Marketo environment and navigate to "Admin."

Step 2: From this menu, choose "Integrations" and "Launchpoint". Here, you can find the "Client ID" and "Client Secret."

Step 3: Then, go to "Integrations" and "Web Services". Scroll down to "Rest API," where you can find the "Endpoint."

Step 4: Log in to Leadinfo and navigate to your "Settings."

Step 5: Under integrations, select "Marketo".

Step 6: Paste the copied information from steps 2 and 3, and click on "Connect with Marketo".

How Do I Automatically Forward Leads to Marketo?
Now that you’ve made the connection, no data is being forwarded to your Marketo environment yet. To do this, you need to link contacts to Marketo using triggers. The steps below explain how to automatically connect contacts to Marketo.
Step 1: Think about which contacts you want to forward to Marketo. Use the following questions to get a clear idea of which contacts are interesting for you:
- What characteristics make a contact interesting?
- Are you focusing on certain industries or specific company sizes?
- What behavior should an interesting contact exhibit on your website?
- How many pages or which pages should a contact visit?
Step 2: Based on the questions in step 1, start setting up triggers. Navigate to "Triggers" in the menu and click "New Trigger" in the top left.
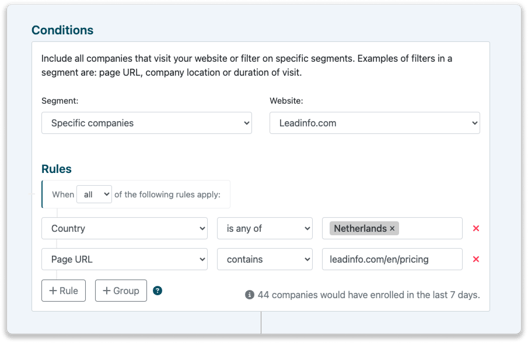
Step 3: Determine the rules that a contact must meet to be forwarded to Marketo. For example, you may only want to forward contacts from The Netherlands who have visited your pricing page.
Step 4: Under "Action", select Marketo.

Step 5: Select which contacts you want to automatically forward to Marketo. You can easily filter by DMU (Decision-Making Unit) or by job title. Under the "DMU" option, you can select a department, forwarding all contacts within that department to Marketo.
When filtering by "Job Title", you can type a specific title. For example, within the Operations department, you may want to automatically forward the Operations Manager. When you select the job title, you will see examples of contacts that match the selected title. Through the "Job Title" filter, you can easily and specifically forward contacts.
