Triggers work real time. Meaning, when a company visits your websites, Leadinfo checks if the company meets the rules in your trigger. Every so often, you want to assign tags to companies that already visited your website. Follow the steps below to set this up.
Step 1: In the Leadinfo portal navigate to "Triggers" and create a new trigger.
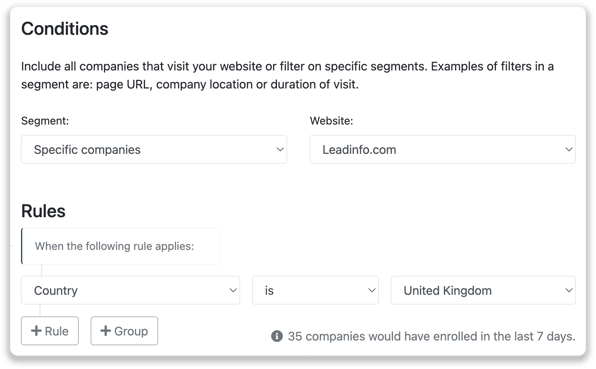
Step 2: Determine the rules your website visitor needs to meet. For example, if you'd like to assign all the companies from the United Kingdom as a Hot lead, select the rule "Country" is "United Kingdom".
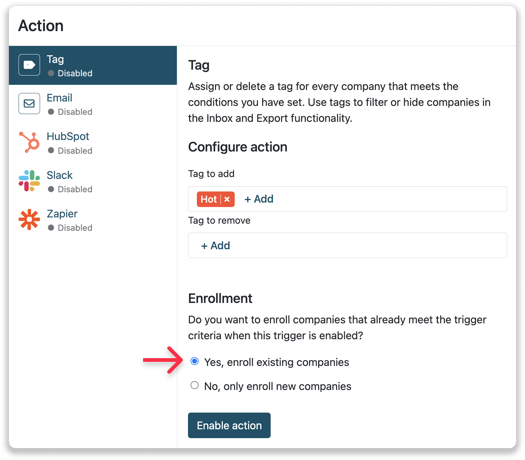
Step 3: Select the action "Tag" below "Action". Determine what tag you'd like to add. In this example, we'll use the tag Hot Lead.
Step 4: Below "Enrollment" you can choose whether you'd like to enrol companies that already met the trigger or only enroll new companies. Here you'll need to select "Yes, enroll existing companies".
Step 5: Enable your action and save your trigger.
Leadinfo will now look at the companies that already visited your website and if they meet the rules in your trigger, they will receive a tag!
Good to know 💡 About the Yes/No Button
When you switch the enrollment button to Yes, the system will immediately process everything as intended. After this action is completed, the button will automatically revert back to No.
So if you open the trigger again later, you’ll see it set back to the default No. This is simply how the feature is designed to work.