The inbox is the place where the data of all your website visitors are shown. The more visitors you have, the more companies we show. To help structure your Leadinfo inbox and help your sales team focus on what's important, we have introduced: Segments.
Segments allow you to create an overview of only the companies that are interesting for follow-up. You can create different segments for your different sales colleagues!
This can be a big switch for our users who have been using Leadinfo for a while. Before segments our users used triggers to automatically assign tags to companies enabling them to filter on said tags in the inbox. Making it easier to create a clear overview.
In this article, we will show you everything you need to know to implement segments successfully in your account and how to move from triggers to segments. Discover more about:
- The benefits of Segments
- The difference between triggers and segments
- Moving from triggers to segments
The benefit of Segments!
Before explaining the difference between a trigger and a segment, let's dive deeper into the benefits of creating segments. First and foremost, with segments you can:
📍 Create clear overview of interesting website visitor for each sales colleague
🏷️ Select companies who need to have multiple tags
⌛ Filter on behaviour of website visitors in a specific period
Why create segments when I already use triggers?
At first sight, segments seem similar to triggers. However, triggers work complementary to segments. In this section, the difference between segments and triggers and how to use them are further explained. Learn more about setting up triggers in this article.
| Triggers allow you to execute immediate actions, such as assigning a tag or sending companies to your CRM. | Segments allow you to create different views in the inbox and they do not execute actions. |
|
Triggers are not associated to a specific period. Meaning, if you set up a trigger it will execute actions from that moment on. It's not possible to specific a specific time such as "this week" or "yesterday" |
Segments allow you to add a filter that is associated to a specifc period. Allowing you to create an overview of companies that visited the "pricing" page" last week. |
| Triggers are saved on account level. If you save a trigger, it will apply to all the companies visiting your website. | You have the option to save segments for yourself or for every one in your team |
Moving from triggers to segments
With the introduction of segments you can easily create a clear overview of interesting visitors without using triggers. However, this doesn't mean that triggers aren't useful any more! Segments are a great addition to your triggers.
We recommend using triggers to automatically assign tags that give information about the company that you instantly wanted to know. For example, assigning tags based on the branch. Moreover, you can keep your triggers to send data to your communication or CRM system that you are working with.
Segments are there to help you create different company overviews in the inbox. Allowing you to create a view only for "hot" leads, or one for each sales colleague.
Feel free to experiment with new segments as well! Building segments now enables you to get an overview of companies who meet multiple labels, for example, those who have the tag "hot" and "customer". Moreover, they can provide you with lists of companies who showed certain behaviour in a specific time period. This could be that they visited your pricing page yesterday. Learn more about how you build new segments in this article.
Duplicating a trigger to a segment
To help our current users transition to this new way of working you can easily copy your current triggers to the rules in your segments. Follow the steps below to find out how.
Step 1: Navigate to the trigger section to find the overview of your triggers.
Step 2: You can duplicate into a segment, similar to how you duplicate into a report. Hoover over "Actions" of the correct trigger and select "Duplicate as segment".
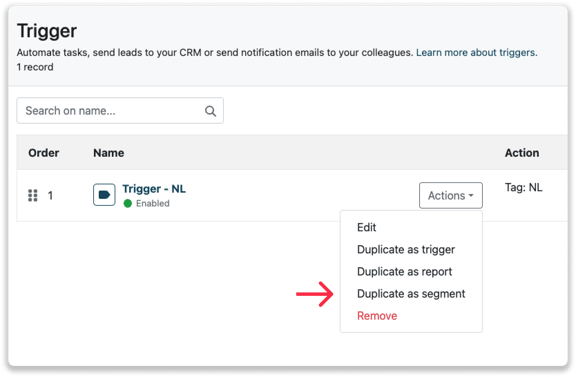
Your trigger is now copied as a segment. Navigate back to the inbox to filter on the segment.
Duplicating a report to a segment
Step 1: If you are used to working with reports, segments can help you to get these separate overviews not only in Excel, but also in your Leadinfo inbox. Navigate to the report section to start duplicating a report to a segment.
Step 2: After the report is created, you can copy this as a segment. Hoover over "Actions" and select "Duplicate as segment".
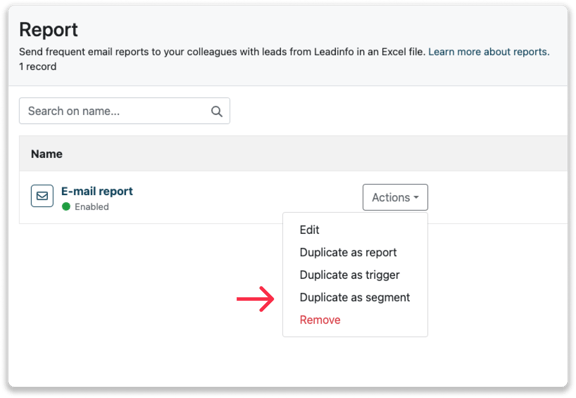
Your report is now copied as a segment. Navigate back to the inbox to filter on the segment.