Gain access to valuable Leadinfo data directly within your own system. Once you’ve linked Leadinfo to Spotler, you can share company information from Leadinfo to Spotler with just a few clicks.
Note: The Spotler integration is only available in the Scale and Pro subscription plans. If this integration is not included in your current plan and you would like to use it, please upgrade your account in the Leadinfo portal.
In this article, we’ll cover:
Benefits of the Spotler Integration
The integration between Leadinfo and Spotler offers several advantages that support both your marketing and sales teams.
Automatically enrich leads in Spotler
Companies identified by Leadinfo on your website can be automatically forwarded to Spotler. This eliminates the need to manually copy data and ensures that no valuable leads are overlooked. Your database stays up to date and complete at all times.
Better segmentation and personalization
With data from Leadinfo, you can create segments in Spotler based on concrete behavior, such as:
-
Which pages were visited?
-
What was the source of the visit?
-
How long did the visit last?
These insights allow you to send targeted campaigns that match your leads’ interests and stage in the customer journey, increasing the relevance and conversion potential of your communication.
Faster follow-up
Because the data is automatically available in Spotler, your marketing and sales teams can take immediate action. For example, launching a personalized email campaign or adding a lead to an existing workflow. This significantly shortens the time from lead to potential customer.
Specifically, with the integration you can:
-
Forward company information to Spotler Connect
-
Share website activities such as visited pages, visit duration, and traffic source
-
Use the data within:
-
Spotler CRM
-
Spotler Activate (CDP)
-
Spotler Mail+ (ESP)
-
How to set up the Integration
When setting up the integration, you’ll use Spotler Connect. You can either create a new connector or use an existing one.
Step 1: Log in to Spotler Connect.
You’ll start on the Dashboard.
Click on Connectors in the menu.

Step 2: Create a new connector or use an existing one
To create a new connector:
-
Click on New Connector.
-
Give the connector a clear name, for example Leadinfo.
-
Fill in all required information, such as name, billing details, and settings.
-
Click Save.
-
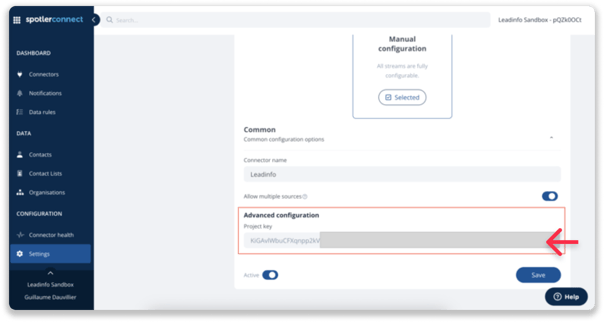
Open the new connector and go to Advanced Settings.

-
Copy the Project Key.

-
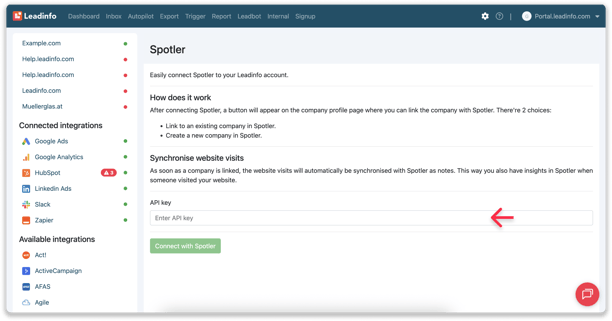
In Leadinfo, go to Settings > Available Integrations > Spotler.
-
Paste the Project Key into the field.

To use an existing connector:
-
Select the connector you want to use.
- Click on Advanced Settings.

- Copy the Project Key.
-
In Leadinfo, go to Settings > Available Integrations > Spotler.
-
Paste the Project Key into the field.
Step 3: Set Up Field Mapping
With Field Mapping, you decide which fields from Leadinfo are forwarded to Spotler. This allows you to tailor the integration to your CRM and marketing processes.
Leadinfo Tip: Want to know how to configure Field Mapping? You can find all the steps in this article.
Automatically forward leads to Spotler
After connecting, companies are not automatically forwarded yet, you’ll need to configure triggers for that.
How to set up triggers:
Step 1: Define your criteria; decide which companies you want to target.
-
Which industries or company sizes are you interested in?
-
Should companies visit specific pages (e.g. pricing or product pages)?
-
How many pages should they view before they qualify as interesting?
Step 2: Create a trigger
-
In Leadinfo, go to the Triggers section.
-
Click on New Trigger.
Step 3: Define the rules.
Set the conditions a company must meet.
For example: Only Dutch companies with more than five employees that have visited the pricing page.
Step 4: Choose an action.
Under Action, select what should happen:
-
Create new companies only
-
Link to existing companies only
-
Create a new company or link to an existing one

Step 5: Save and activate the trigger.

From now on, the right companies will be automatically forwarded to Spotler.
Leadinfo uses data points such as domain, Chamber of Commerce number, or phone number to prevent duplicates.
Manually forward leads to Spotler
If you prefer to decide yourself which companies are sent to Spotler, you can also do this manually.
Step 1: In Leadinfo, open the company profile you want to link.
Step 2: Click the Actions button beneath the company name and choose Link with Spotler.

Step 3: Link the company:
-
Link to an existing company: Search for the company in Spotler and click Connect.
-
Create a new company: Enter the company name and click Create and Connect.

The linked companies will then appear in Spotler Connect under the Data tab in Organisations.