How to add Leads to Leadinfo Autopilot
There are 4 ways to add Leads to Leadinfo Autopilot! Determine how you want to add your leads.
Where to add leads to a campaign
Leads can be added to any of your running campaigns from multiple places in the portal.
- Autopilot overview - As soon as you open Autopilot in the you can click on the "plus" sign at the top left. Here you find different options on how you can add leads to autopilot. These are all explained below.

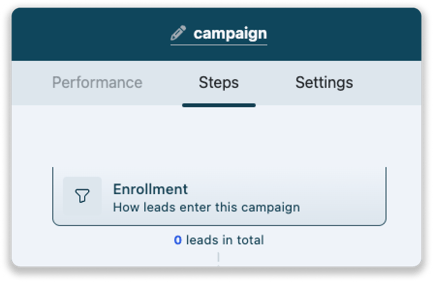
- From a campaign - Once you are building your campaign leads can also be added from the campaign itself. In steps, select "Enrollment" and the menu to add leads will pop-up.

- From the leads overview - Once your campaign is built and activated, you can import new leads into the existing campaign. Simply select the campaign you wish to enhance, then navigate to the leads section. Here, you will find a option to import leads by clicking the "+ add leads" button.

After creating and activating your campaigns, the next step is to enrol your leads into them. You can add contacts in different ways:
- Automatically through triggers
- Manually add Leadinfo Contacts from the company profile
- Copy and paste an e-mails list
- Upload a CSV file
Automatically add the decision maker of a company to Autopilot
With triggers, you can automatically share the decision maker of a website visitor to Leadinfo Autopilot. Follow the steps below to set up this automation.
Please note 📝 We only send 1 decision maker to Leadinfo Autopilot. If there are multiple decision makers per department, we push the contact who works the longest at the company.
Step 1: Head to your triggers and create a new trigger
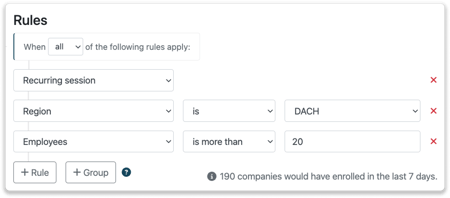
Step 2: Determine the rules a company needs to meet in order to be added to Leadinfo Autopilot. Think about the company characteristics or behaviour they show on your website.

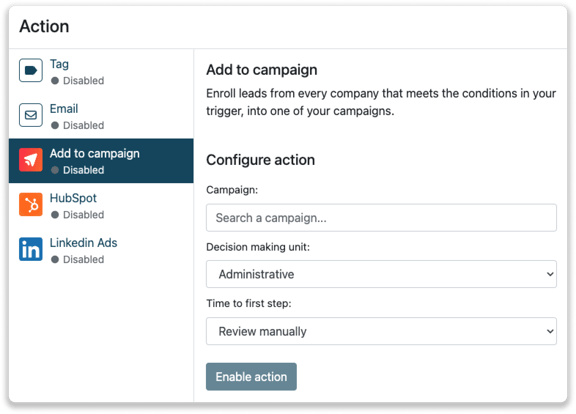
Step 3: Below "Action" Select the action "Add to campaign".
Step 4: Configure the action to be executed.
- Choose which campaign you want to add the contact to.
- Determine from which department you want to send the decision maker.
- Select the first step of the campaign. Do you want it to start immediately, have a delay, or first manually assess the leads.

Step 5: Enable your action and save your trigger!
Manually add Leadinfo Contacts to Autopilot
If you do not wish to automatically push contacts to Autopilot, you can also manually share the leads from the Leadinfo inbox. Simply head to the company profile in the Leadinfo inbox to get started!
Within the profile, head to the section "Contacts".
Next to each contact, you will see a share button. Click on this button to add the contact to Leadinfo Autopilot.


When the share button is Pink, the lead is not added to Leadinfo Autopilot. When the share button is Blue, the lead is already in Leadinfo Autopilot!
Once you add the lead, select the campaign to which the lead will be linked. If your contact is already added to a campaign, they cannot be placed in another campaign simultaneously.
Import leads by copying and pasting e-mail addresses
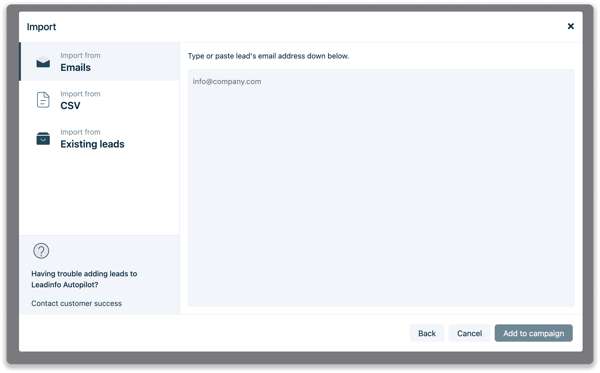
Simply copy and paste a list of e-mails in this pop-up.

Please note 📝 When you add leads by copying and pasting the information, you cannot add personalisation to the content, unless you update the contact afterwards.
Import from a CSV file
Import your leads using a CSV file. By importing the leads using the CSV file you can add more information such as company name, LinkedIn account, phone number and other info!
Download the .csv template from the portal to get started!
Provide all the info needed in the template. Then, upload the file and click on "Add Leads".
Keep the following in mind when uploading your .csv file:
- All headers in the CSV template must be included. Even if you leave the columns empty.
- Headers should stay in the CSV template’s original order
- There's a maximum of 1000 contacts
- Only .csv files are accepted
