How to build an Autopilot campaign for someone else
Learn all about how to build and manage Autopilot campaigns for someone else when working with Leadinfo Autopilot.
In Leadinfo Autopilot, you can effortlessly create and manage campaigns on behalf of other users within your organization or, as a partner, for companies you oversee. This article will guide you through setting up campaigns with email and LinkedIn actions in someone else's name.
Step 1: Navigate to Autopilot and choose an existing campaign you want to edit or create a new one just as you would do for yourself. Not sure how to create a campaign? Check out this help article for a step by step explanation.

Step 2: Now, simply select a step in your campaign, or choose a step in a new one, so the side pane opens on the right. At the top, you'll see which account is connected to send this step. To change the sender for the entire campaign, click on "Sender for this campaign: (Change)".

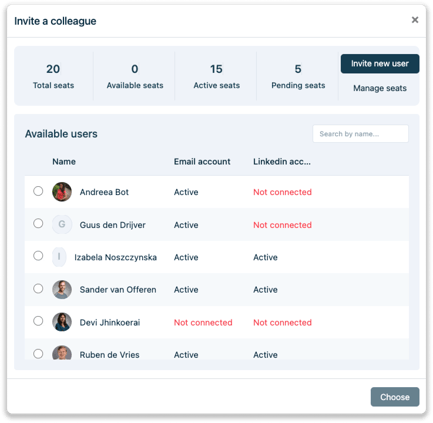
If you see a list of people, it means they have already been invited in the past and connected their accounts. If the connection is only partially complete, they will also receive an email to connect the accounts. The status of each user is shown in the overview.
-
- Active: the account is connected successfully
- Not connected: the account is not yet connected by the user
- Revoke invitation: the user is invited but has not connected their accounts. Press the button to revoke the invite.

Please note 📝 In order to connect your email and LinkedIn in Autopilot, the user needs to be an active user in your Leadinfo account. Navigate to "Settings > Users" to invite new users to the account.
Step 4: The campaign cannot be activated until the user has connected their accounts. Once the user completes the connection, a notification email is sent to the campaign builder. You can then proceed to activate the campaign.
Step 5: Activate the campaign and add your leads! Want to know more about how to add leads to a campaign, check out this article.
Manage seats
If you click "Manage Seats", you'll see an overview of all the users linked to your Leadinfo account. This overview shows which users currently have an Autopilot seat and who has received an invitation to join.
To reassign seats, hover over a user and select "Change Seat". This allows you to remove a seat from one user and assign it to another. If you need to assign a new seat to a user, click "Assign Seat."
If you run out of seats, a notification will alert you, and you’ll have the option to purchase additional seats to accommodate more users. This ensures that you can efficiently manage your team’s access to Autopilot and maintain smooth operation of your campaigns.