1. Help Centre
  2. Features & Functions

Leadinfo E-mail Tracking

Gain insights in how effective your sales e-mails are with Leadinfo E-mail Tracking. Learn more on how to set up the feature!

Do you have insights in how effective your cold email activities are? Do you know what leads click through to your website from your sales emails? Well now you do! The Leadinfo E-mail tracker gives insights in the effectiveness of your cold email activities.

The Leadinfo E-mail tracker allows you to 
  • Track interactions of your cold email efforts within Gmail and Outlook
  • Easily spot leads that visit your website through your sales emails 
  • Exactly see what pages a person visited
  • Create segments and automation based on visits from your sales e-mails. 

In this article we’ll show you how to set up e-mail tracking and where you can find the information within Leadinfo.


Please note: In order to use e-mail tracking you need to ensure that you are GDPR-compliant. Read more about GDPR compliance whilst using the e-mail tracking in this article


Set up the e-mail tracking extensions


Leadinfo provides e-mail tracking extensions for Gmail and Outlook. Follow the steps below to set up your E-mail extensions. 


Install E-mail Tracking for Google Chrome


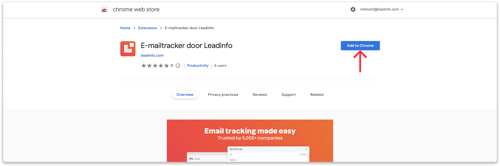
Step 1: Head to E-mail Tracking in the portal to download the most recent Google Chrome extension


Step 2: Add the extension to Chrome. Google will automatically direct you to your Gmail.


Step 3: In your email, you will now find Leadinfo Logo on the right sidebar. Click on the Logo and enable the extension to start tracking your emails! 

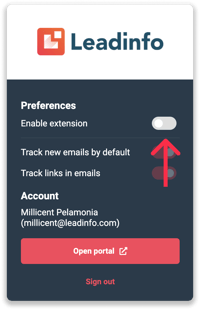
Step 4: Determine what you want to do:

  • Track new e-mails by default: Select this option if you automatically want to track all e-mail send. If you turn this off you can determine to track the e-mail when you create a new e-mail. 
  • Track the links in your e-mails: Select this option if you want to track if someone clicks on the links in your e-mail. If you turn this on you will see the exact pages the lead visits after they clicked through in your e-mail. 

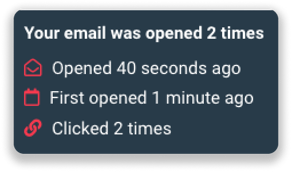
Step 5: You will now see two checkmarks next to each e-mail.

  • If one check mark is coloured the email is tracked but not yet opened
  • If two checkmarks are coloured, the email is tracked and has been opened.


Hover over the checkmark to view detailed information on when the e-mail was opened for the first time, when it was opened for the last time and how often someone clicked on the URL. 


Install E-mail Tracking for Outlook Web Version


Step 1: Head to E-mail Tracking in the portal to download the most recent Outlook extension

You must download the file that was provided. You should save it as an xml 


Step 2: Open your Outlook in a web browser 

Step 3: Open one of your emails and click on the 3 dots


Step 4: Click Get Add-ins 


Step 5: Go to my add-ins and add a custom add-in. Please choose the option add from File.


Step 6: insert the file that you downloaded in Step 1 from the portal


After clicking OK you should see the Leadinfo email tracker extension under your Custom Addins.


Step 7: For the web version, you can pin the add-in. Go to Settings click Mail, Customize actions, and check the box for email tracker by Leadinfo.


Step 8: Now it's time to connect your Leadinfo account in the extension. Create a new email and in the email click on the 3 dots. Select email tracker by Leadinfo.


Step 9: To sign in select "Sign in" and provide your Leadinfo credentials. After accepting the terms and conditions you are ready to start using the e-mail tracker! 


Step 10: Determine what you want to do:

  • Track new e-mails by default: Select this option if you automatically want to track all e-mails send. If you turn this off you can determine to track the e-mail when you create a new e-mail. 
  • Track the links in your e-mails: Select this option if you want to track if someone clicks on the links in your e-mail. If you turn this on you will see the exact pages the lead visits after they click through in your e-mail.

Step 11: Send your first mail. Make sure you enabled the extension. 

E-mail information within Outlook

With the extension you can check if your e-mail has been opened and if the receiver clicked through in the email. To do so:

  • Head to the sent email and click on the Leadinfo Icon. Can't see the Leadinfo Icon? Click on the 3 dots and click on "E-mail tracker by Tracker" 

  • After opening the extension you will see more information on opens and clicks! 


Install E-mail Tracking for Outlook Desktop


Please note: Leadinfo E-mail tracking only supports the following versions.

  • Outlook 2013 or later on Windows (Add-in displays the supported state)
  • Outlook 2016 or later on Windows (Add-in displays the supported state)
  • Outlook 2016 or later on Mac
  • Outlook 2019 or later on Windows (Add-in displays the supported state)
  • Outlook 2019 or later on Mac
  • Outlook on Mac (Microsoft 365)
  • Outlook on Windows (Microsoft 365)


Step 1: Head to E-mail Tracking in the portal to download the most recent Outlook extension

You must download the file that was provided. You should save it as a XML 


Step 2: Open your outlook in the desktop version and head to one of your email. Here you need to click on the 3 dots 

Step 4: Click Get Add-ins 


Step 5: Go to my add-ins and add a custom add-in. Please choose the option to add from File.


Step 6: Insert the file that you downloaded in step 1 


After clicking OK you should see the Leadinfo email tracker extension under your Custom Addins.


Step 7:  For the web version you can pin the add-in. By clicking on the pin 


Step 8: Now it's time to connect your Leadinfo account in the extension. Create a new email and in the email click on the 3 dots. Select email tracker by Leadinfo.


Step 9: To sign in select "Sign in" and provide your Leadinfo credentials. After accepting the terms and conditions you are ready to start using the e-mail tracker! 


Step 10: Determine what you want to do:

  • Track new e-mails by default: Select this option if you automatically want to track all e-mail send. If you turn this off you can determine to track the e-mail when you create a new e-mail. 
  • Track the links in your e-mails: Select this option if you want to track if someone clicks on the links in your e-mail. If you turn this on you will see the exact pages the lead visits after they clicked through in your e-mail.


Step 11: Sent your first mail. Make sure you enabled the extension.


E-mail information within Outlook

With the extension you can check if your e-mail has been opened and if the receiver clicked through in the email. To do so:

  • Head to the sent email and click on the Leadinfo Icon. Can't see the Leadinfo Icon? Click on the 3 dots and click on "E-mail tracker by Tracker" 

  • After opening the extension you will see more information on opens and clicks! 


E-mail information within Leadinfo


Now that you have set up the extension, you can start identifying the leads that visit your website through your sales mails. Within Leadinfo you can filter based on the e-mail tracker activity! 


Where to find e-mail information?

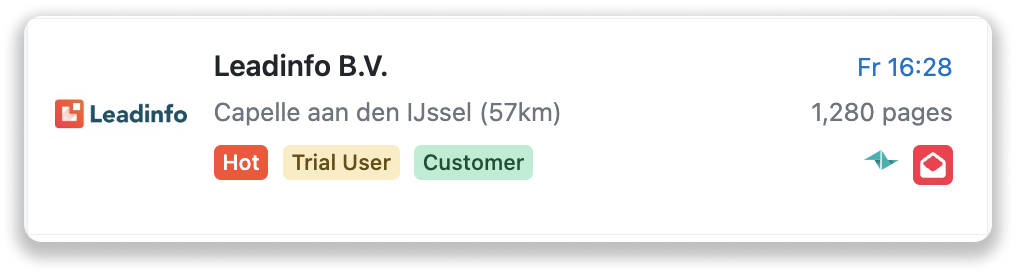
If a lead visits the website through one of your cold e-mails, and you've set up the e-mail tracker extension an E-mail Icon is added to the company in the inbox. As seen in the image below. 


Once you click on a company profile you will see the email address above the activity as seen below.


Opens and clicks of a tracked email can also be found in the company profile. 


View all E-mail Tracker visitors in the inbox


Easily create an overview of visitors visiting your website through your cold emails.

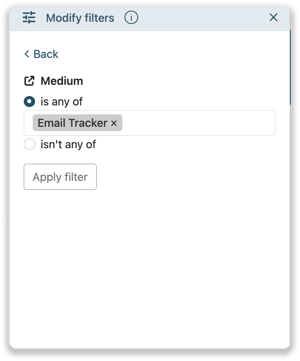
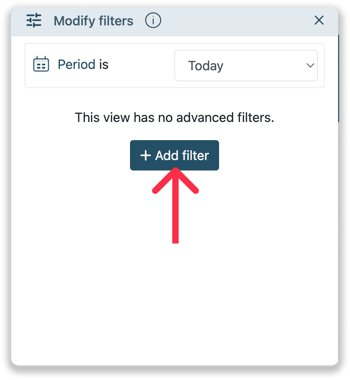
Step 1: In the Leadinfo inbox, click on "Advanced Filters" and click on "+Add filter".


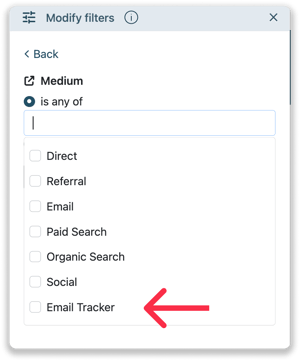
Step 2 : From the list of filters, select the filter "Medium". Here you'll need to select "Email Tracker".


Step 3 : Apply the filter to see all the leads visiting your website through your sales emails.