When your website generates a large amount of traffic, it might be useful to only receive an email when interesting companies visit your website. To set this up, you will need to use the functionality triggers.
With a trigger, you provide a set of rules that your website visitor needs to meet. When a company visits your website and meets these rules, you can automatically send a notification email to yourself or your colleagues. This means you will receive a separate email for each qualified lead. You can find more information on triggers here. In this article, we will explain setting up a notification email by using an example.
Webshop Example
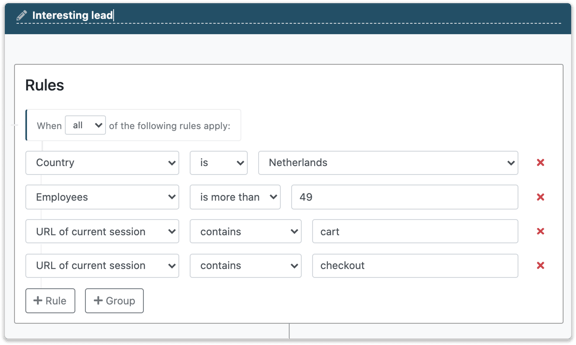
To explain how you can set up a notification email, we will use the example of a webshop that sells desks to companies. The webshop immediately wants to know when a company clicked on the cart but did not purchase anything. A website visitor is interesting for the webshop when the company:
-
has at least 50 employees
-
is active in the United Kingdom
-
has added something to their cart
-
did not go to the check-out page.
Set up rules
The trigger needs to be set up as shown in the below image. Always check what the unique text in your URL is. Your company might use "Basket" instead of "Cart" in the URL.
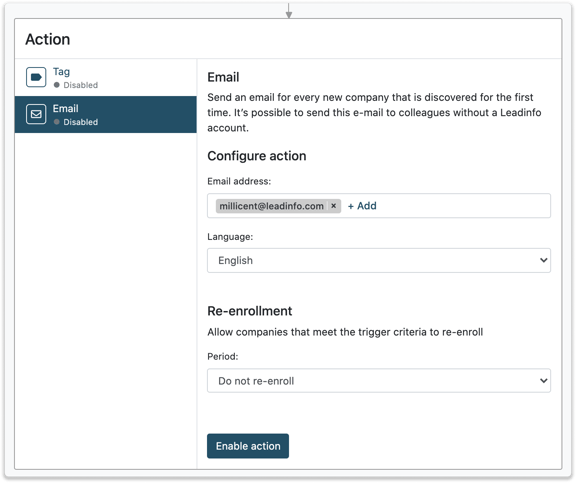
Set up an Action
After determining the rules, you need to enable the action "Email". Click on Email and add your colleagues you want to email.
You can select under “Languages” in which language the notification email needs to be sent.
And finally, you can also set up whether a company should be re-enrolled for the trigger or not.
You and your colleague will receive an email with general information on the company. For more information, you'll need to access the portal.
When using multiple triggers and wish to streamline your email notifications, it is recommended to create reports instead. Click here to learn more about reports.