You can easily install the Leadinfo tracking code on your WordPress website. There are even different options to choose from.
We recommend installing Leadinfo through Google Tag Manager if you've already installed this on your website. If you are not using Google Tag Manager, you can install the tracking code via our WordPress plugin of via the direct integration!
In this article, we'll cover both methods:
Installing Leadinfo using the WordPress plugin
We have created an easy-to-install plugin. Simply follow the steps below or watch the video for a detailed explanation, and start recognising the companies that visit your website.
Step 1: Copy the “Site ID” from the Leadinfo portal. You can find the Site ID in the pop-up on your screen. Or if you've already been using Leadinfo navigate to settings and click on the website under “Websites” to find the tracking code.
![]()
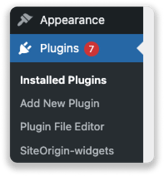
Step 2: Go to WordPress and add the Leadinfo plugin to your website. Simply go to “Plugins” and click on “Add new”.
Step 3: Download the Leadinfo plugin by searching for Leadinfo in the top right corner and select “Install now”.

Step 4: Activate the plugin by clicking on the blue button, “Activate”. Then go to your installed plugins and click on “Settings” of the Leadinfo plugin. Here, you need to paste the unique site ID that you copied in the first step.
Step 5: Do not forget to save the changes you've made. Once you've saved your plugin, the tracking code will be live immediately.
As a new user, you will gain access to the rest of the portal when we have registered the first company visit on your website.
Installing Leadinfo via the direct integration
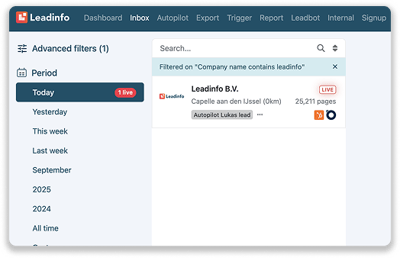
Step 1: Go the the Leadinfo portal and navigate to ''settings''
Step 2: Click on "Websites" in the menu and select "WordPress".
![]()
Step 3: Log in via WordPress

Step 4: Enter any password to finalise the integration.

Congratulations! The Leadinfo integration is complete. From now on, your first visitors will appear in the Leadinfo inbox.
Good to know: It can take up to 10 minutes for Leadinfo to recognise the tracking code. During this time, you may still see a notification in Leadinfo stating that the tracking code has not been placed. More information regarding the verification proces can be found here.
