Tagging your existing customers in Leadinfo allows you to organize and categorize website visitors efficiently. This helps in tracking engagement, setting up personalized follow-ups, and improving sales processes.
To save time and ensure consistent tagging, Leadinfo offers several ways to automatically tag returning customers when they visit your website.
In this article, we’ll walk you through three powerful methods for tagging customers:
1. Bulk Tagging
If you have a list of customers you wish to tag in Leadinfo, the bulk tagging feature offers an efficient way to apply labels. To utilize this feature, simply upload a file. Leadinfo will then identify website visitors that correspond with the information in your file and automatically assign the specified tags to those companies.
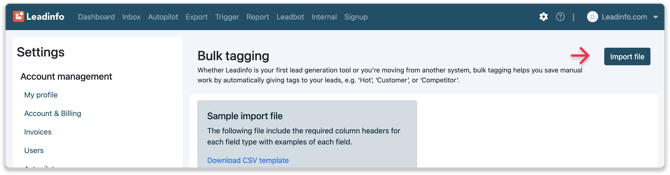
Step 1: Navigate to the settings menu (by clicking the cog in the top right corner) in Leadinfo.
Step 2: Locate and select the "Bulk tagging" functionality.

Step 3: Click on "Import file" to choose and upload your desired CSV file.
Step 4: Input the tag name you wish to assign and confirm your action to apply the tags.

This method is particularly beneficial for those who have an established customer list and wish to automatically apply tags to those profiles. The tags will not only be applied retroactively to existing customers but will also be assigned whenever these customers visit the website in the future
💡 Leadinfo tip: If you’re interested in learning more about the bulk tagging functionality, additional information can be found in this article.
2. Triggers based on CRM properties
Leadinfo can automatically tag website visitors based on data from your connected CRM system. This gives you an instant overview of the website visitors who are either connected or not connected to your CRM system.
To set up this automation,
Step 1: Connect Your CRM System
Begin by establishing a connection with your CRM system. Within the Leadinfo settings, you will find a list of available direct integrations. Select your preferred CRM from this list to connect it to Leadinfo in settings menu.

Step 2: Configure the Trigger
Next, navigate to the trigger functionality. When setting up your trigger rules, you can specify "specific companies" and apply filters based on the integration you have just established.

Step 3: Define Your Criteria
In this step, you can set criteria for your trigger. For instance, you may want to trigger actions based on whether a company is linked to your CRM or filter by deal stages, such as "active customers" or "deals won." This will enable you to generate a clear overview of all existing customers who visit your website.


💡Leadinfo tip: For further guidance on setting up triggers, additional information can be found here.
Step 4: Select Actions
Finally, scroll down to the "actions" section of the trigger setup. Here, you can choose your desired label. For example, selecting the tag "customer" will help you easily identify when an existing customer visits your site.

3. Tagging Customers via a Login URL
An additional method for tagging your customers involves using a designated login URL. If your website features a specific login area exclusively for customers, you can configure a trigger in Leadinfo to automatically tag these customers:
Step 1: Determine the specific URL pattern for customers who are logged in (for example, yourwebsite.com/login).
Step 2: In Leadinfo, navigate to the Triggers section and create a new trigger.
Step 3: Set the condition to identify visits to the specified login URL.

Step 4: Select "Add Tag" as the desired action and input an appropriate tag name.

Step 5: Click "Save" to finalize the trigger.

With this method, Leadinfo will tag any visitor who accesses the login page, allowing you to easily distinguish customers from new visitors.
By implementing these tagging methods, you can effectively categorize your customers and optimize your sales and marketing efforts within Leadinfo.